Sciatica Stretches & Exercises
Sciatica Stretches for Immediate Relief (With Photos): The Complete 2026 Guide
Best sciatica stretches for immediate relief with step-by-step photos. 10 PT-approved moves for piriformis syndrome, nerve pain, and back pain. Updated April 2026.
Sciatica stretches work — but only if you do the right ones, in the right order, for the right amount of time. The single most effective stretch for piriformis-related sciatica (the most common type) is pigeon pose, followed by supine figure-4 and standing figure-4. Done consistently 2–3 times daily, most people feel 30–50% pain reduction within the first week. This guide covers all 10 stretches with photos, hold times, difficulty ratings, and a complete daily routine from a licensed physical therapist.
Why Stretches Are the Best First Step for Sciatica
When sciatica strikes, most people reach for medication, heat packs, or simply lie in bed. But research and clinical practice both point to one intervention as the most effective first-line home treatment: targeted stretching.
Here is why stretching works so well for sciatica nerve pain:
1. It directly addresses the most common cause. In roughly 70% of sciatica cases, the piriformis muscle in the buttock is the culprit. This small muscle runs directly over the sciatic nerve where it exits the pelvis. When it tightens — from prolonged sitting, poor posture, overtraining, or an acute injury — it compresses the nerve against the bone, producing the sharp, burning pain that shoots down the back of the leg. Stretching the piriformis directly releases this compression.
2. Stretching improves nerve mobility. The sciatic nerve is not a static cable — it slides and glides through a tunnel of surrounding tissues. When inflammation or muscle tightness restricts this movement, every leg motion tugs on the compressed nerve, amplifying pain. Gentle stretching restores nerve glide, reducing mechanical irritation.
3. Decompression happens immediately. Many sciatica stretches — especially supine positions — create space between lumbar vertebrae, reducing pressure on the nerve root. This decompression effect can begin within seconds of assuming the correct position.
4. It breaks the pain-spasm cycle. Sciatica triggers a protective muscle guarding response. Tight muscles compress the nerve, the nerve fires pain signals, the brain responds by tightening muscles further. Stretching interrupts this feedback loop at the source.
5. No side effects, low cost, always available. Unlike medication (which carries gastrointestinal, cardiovascular, and dependency risks) or surgery (which carries infection, nerve damage, and recovery risks), stretching has no systemic side effects. It costs nothing, requires no appointment, and can be done anywhere.
For a full comparison of stretching versus bed rest, see our guide on bed rest vs. exercise for sciatica.
Understanding the Sciatic Nerve and Why It Hurts
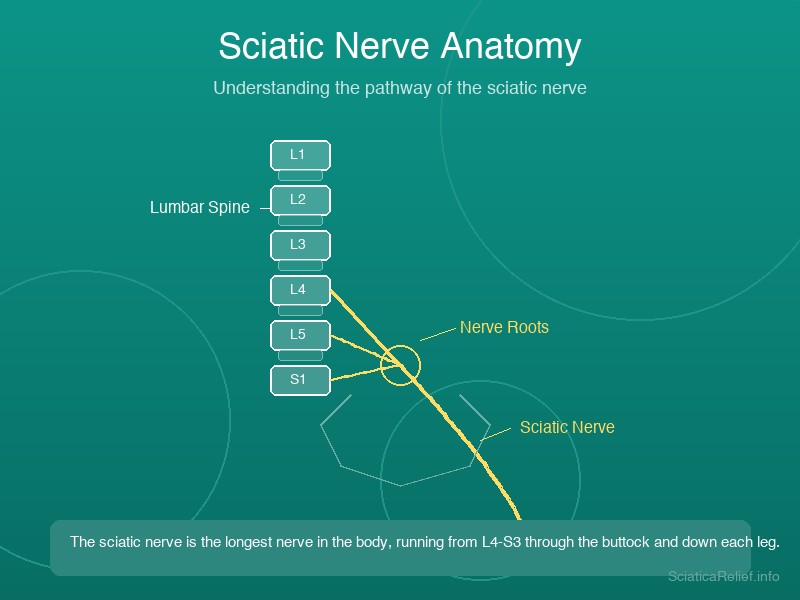
The sciatic nerve is the largest and longest nerve in the human body. It forms from nerve roots L4, L5, S1, S2, and S3 at the base of the spine, combines into a single cable roughly the width of your thumb, and travels through the pelvis, under the piriformis muscle, and down the back of each leg all the way to the foot.
Three primary compression points cause sciatica:
| Location | Cause | Best Stretches |
|---|---|---|
| Lumbar nerve root | Herniated disc, bone spur, spinal stenosis | Supine knee-to-chest, prone press-up, cat-cow |
| Piriformis muscle | Muscle tightness, overuse, prolonged sitting | Pigeon pose, supine figure-4, standing figure-4 |
| Deep gluteal space | Glute tightness, fascial restrictions | Lying spinal twist, standing glute stretch |
Understanding which point is causing your pain determines which stretches will help. The piriformis stretches in this guide address the most common cause — if your pain is concentrated in the buttock and worsens with sitting, piriformis targeting stretches are your answer. If your pain originates in the lower back and shoots down the leg, lumbar decompression stretches are more appropriate.
Our guide on sciatica vs. piriformis syndrome explains the key differences in symptoms and treatment approach in detail.
Pre-Stretch Safety Checklist
Before beginning any stretch in this guide, review the following safety guidelines:
- Never stretch through sharp, electric, or shooting pain — A mild pulling sensation in the muscle is normal. A sharp, stabbing pain or jolt of electricity down the leg means stop immediately.
- Stop if numbness worsens or spreads — Numbness that gets more intense or travels further down the leg after a stretch is a warning sign. Reduce intensity or discontinue that stretch.
- Warm up for 5 minutes first — Stretching cold muscles is less effective and riskier. Walk gently, march in place, or do 5 minutes of light movement before beginning.'
- Use a yoga mat on a firm surface — Soft couches and beds don't provide stable support for form-heavy stretches like pigeon pose.
- Breathe steadily throughout — Holding your breath creates intra-abdominal pressure and muscular tension that counteracts the stretch. Exhale into each position.
- No bouncing — static holds only — Ballistic (bouncing) stretching causes micro-tears in muscle fibers and can worsen nerve irritation.
- Check in 24 hours — If a stretch makes your pain noticeably worse the following day, modify the intensity or skip that stretch.
- Know when to see a doctor first — If you have progressive leg weakness, loss of bladder or bowel control, known spinal fractures, severe disc herniation on MRI, or recent spinal surgery, consult your physician before beginning any stretching program.
Red flags requiring immediate medical attention:
- Cauda equina syndrome symptoms (loss of bladder/bowel control, saddle numbness)
- Progressive leg weakness or foot drop
- Pain that started after major trauma
- Unexplained fever with back pain
10 Sciatica Stretches With Photos
Each stretch below includes step-by-step instructions, difficulty rating, target muscle, recommended hold time, and modifications. All images are placed inline to illustrate the exact position described.
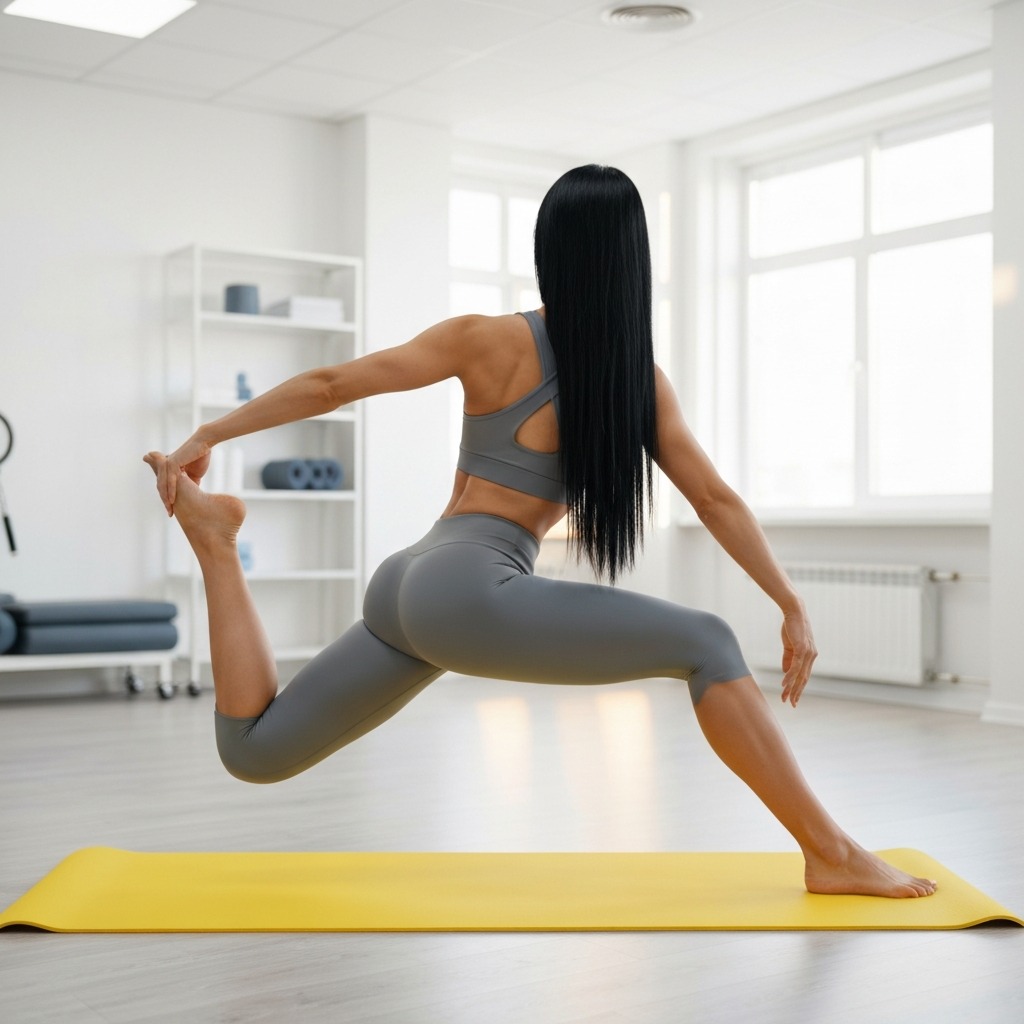
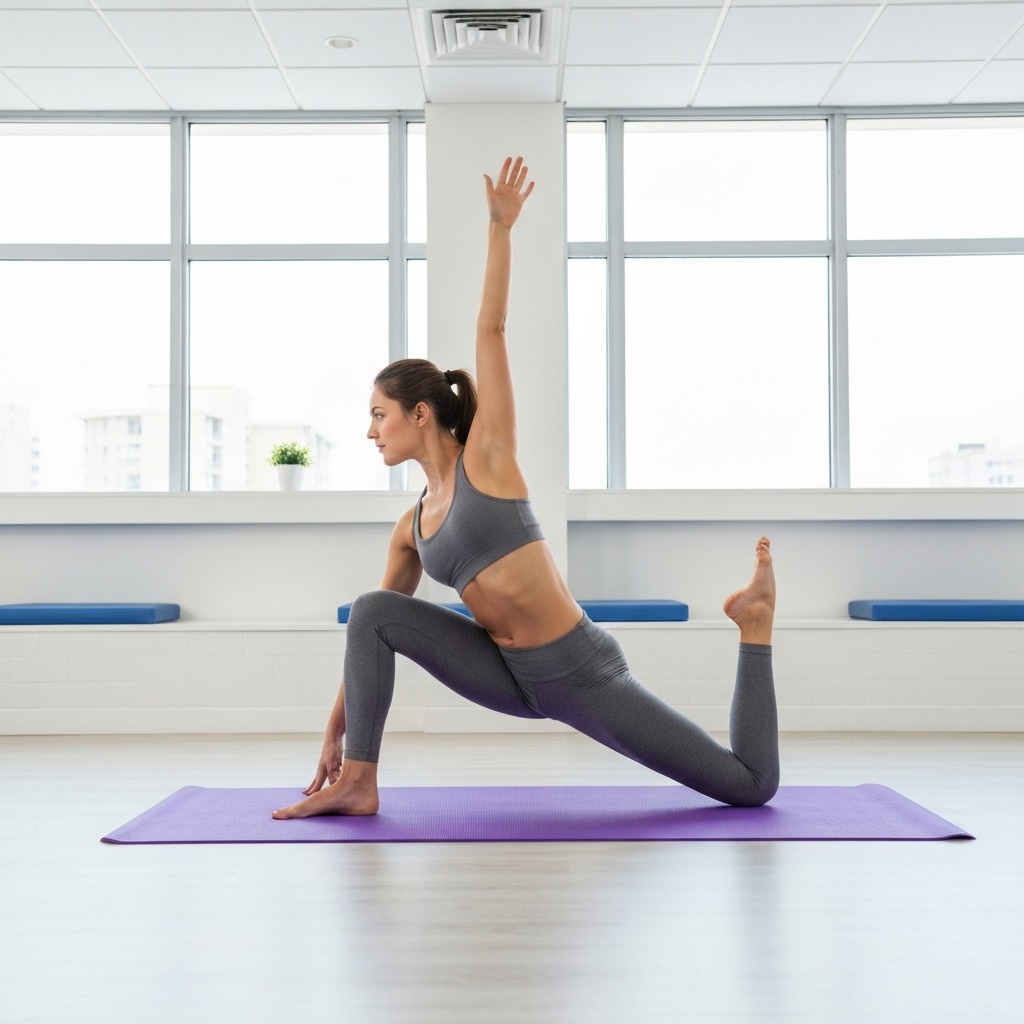
Stretch 1: Pigeon Pose — The #1 Piriformis Stretch
Difficulty: Intermediate · Target: Piriformis · Hold: 45–60 seconds per side
Pigeon pose is the single most effective stretch for piriformis-related sciatica. It targets the muscle directly and with significant intensity, making it the go-to move when buttock pain is the primary complaint.
Step-by-step instructions:
- Begin on your hands and knees on a yoga mat (tabletop position)
- Bring your right knee forward and place it on the mat, slightly behind your right wrist — your shin should angle toward your left wrist at roughly 45 degrees
- Extend your left leg straight back behind you, keeping your left knee on the mat and your left foot pointing toward the wall behind you
- Slowly lower your right hip toward the floor — you should feel a firm, deep stretch in your right outer hip and buttock
- Keep your chest upright and your hips square to the front of the mat (don't let your right hip rotate open)
- Hold for 45–60 seconds, breathing deeply into your lower back and hip
- To exit: press your hands into the mat and slowly slide your right knee back toward your body, then extend your left leg back to rejoin your right leg in tabletop
- Repeat on the left side
Modifications:
- Beginner: Place a folded towel or yoga block under your right hip to reduce the range of motion required. This makes the stretch accessible without losing effectiveness.
- Advanced: Walk your hands forward and fold your chest toward your right shin to deepen the stretch significantly.
- Seated chair modification: Sit in a chair, cross your right ankle over your left knee (figure-4), and gently lean your torso forward over your left thigh.
Hold: 45–60 seconds per side · Repeats: 2–3 times per side · Frequency: 3–4 times daily during acute phase
Stretch 2: Standing Figure-4 Stretch
Difficulty: Beginner · Target: Piriformis, gluteus medius · Hold: 30–45 seconds per side
Standing figure-4 is the most accessible piriformis stretch — it requires no floor work and can be done at your desk, in an office hallway, or anywhere with a wall for balance support. Despite being easier than pigeon pose, it targets the same muscle with excellent effectiveness.
Step-by-step instructions:
- Stand facing a wall, desk, or chair back for balance support
- Place your hands on the wall at shoulder height
- Lift your right foot off the ground and cross your right ankle over your left knee, creating a "4" shape with your legs
- Slowly bend your left knee, sitting your hips back and down as if lowering into a chair
- Keep your chest upright and your hips level — don't let your right hip drop significantly
- You should feel a deep stretch in your right hip, buttock, and outer thigh
- Hold for 30–45 seconds
- Straighten your left leg to standing, lower your right foot, and switch sides
Modifications:
- Beginner: Stand with both hands firmly on the wall throughout the hold — do not attempt hands-free balance.
- To deepen: Sit back deeper into the stretch, increasing the bend in your standing knee.
- Office version: Use your desk or office chair for the same balance support.
Hold: 30–45 seconds per side · Repeats: 2–3 times per side · Frequency: 3–4 times daily
Stretch 3: Supine Knee-to-Chest
Difficulty: Beginner · Target: Lower back, hip flexors, glutes · Hold: 45–60 seconds per side
This is the safest and most universally recommended starting stretch for anyone new to sciatica stretching. Lying on the back eliminates gravitational load on the spine and allows gentle, controlled lumbar decompression.
Step-by-step instructions:
- Lie on your back on a yoga mat with both knees bent and feet flat on the floor
- Bring your right knee toward your chest
- Clasp your hands behind your right thigh (below the knee, not on the kneecap)
- Gently pull your right thigh toward your chest until you feel a comfortable stretch in your lower back and right hip
- Keep your left foot flat on the floor with a slight knee bend — do not press your left leg flat if it causes discomfort
- Keep your head and shoulders relaxed on the mat
- Breathe deeply — allow your exhale to deepen the stretch naturally
- Hold for 45–60 seconds, then slowly release and switch to the left side
Modifications:
- For very tight hamstrings: Keep a small bend in your bottom leg throughout — do not force it flat.
- With a yoga strap: Loop an 8-foot yoga strap around your thigh if your arms cannot comfortably reach.
- For disc-related sciatica: This is one of the safest stretches — keep the movement slow and controlled.
Hold: 45–60 seconds per side · Repeats: 2 times per side · Frequency: 2–3 times daily
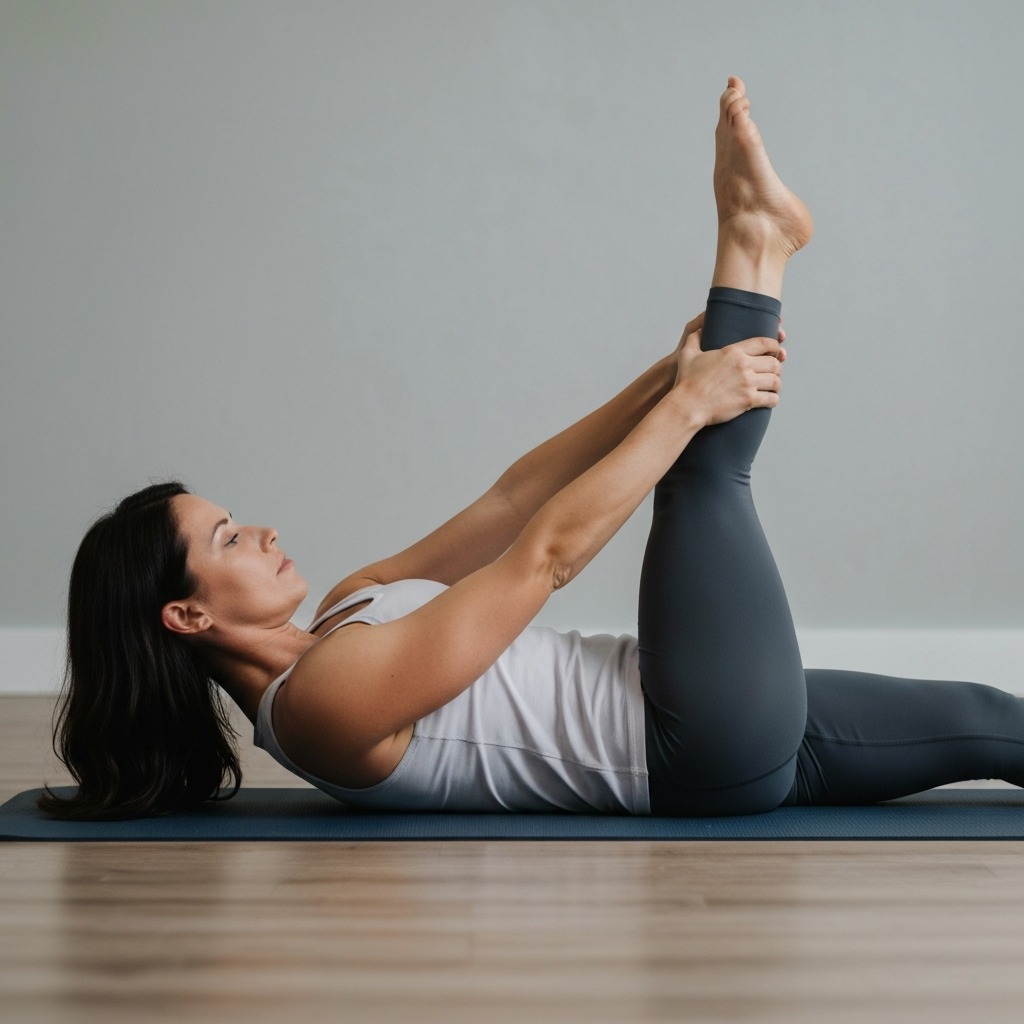
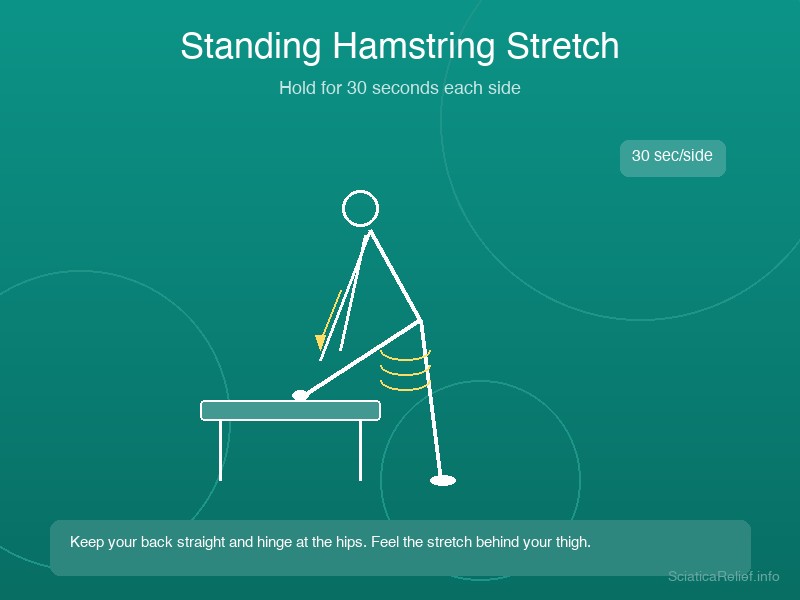
Stretch 4: Seated Hamstring Stretch
Difficulty: Beginner · Target: Hamstrings, sciatic nerve pathway · Hold: 45–60 seconds per side
Tight hamstrings are a major contributor to sciatic nerve tension. The hamstring attaches to the sitting bone (ischial tuberosity), which sits directly adjacent to the sciatic nerve. Releasing hamstring tension reduces pull on the sitting bone and decreases overall nerve tension.
Step-by-step instructions:
- Sit on the floor with both legs extended straight in front of you
- Flex your feet so your toes point toward the ceiling
- Bend your left knee and bring your left foot flat on the floor, close to your inner right thigh
- Sit up tall — lengthen your spine as if a string pulled the crown of your head toward the ceiling
- From your hips (not your waist), lean your torso gently forward over your right leg
- Reach your hands toward your right foot or shin — stop when you feel a stretch in the back of your right thigh
- Do not aggressively round your lower back — the forward motion should come from your hip joints
- Hold for 45–60 seconds, then switch to the left side
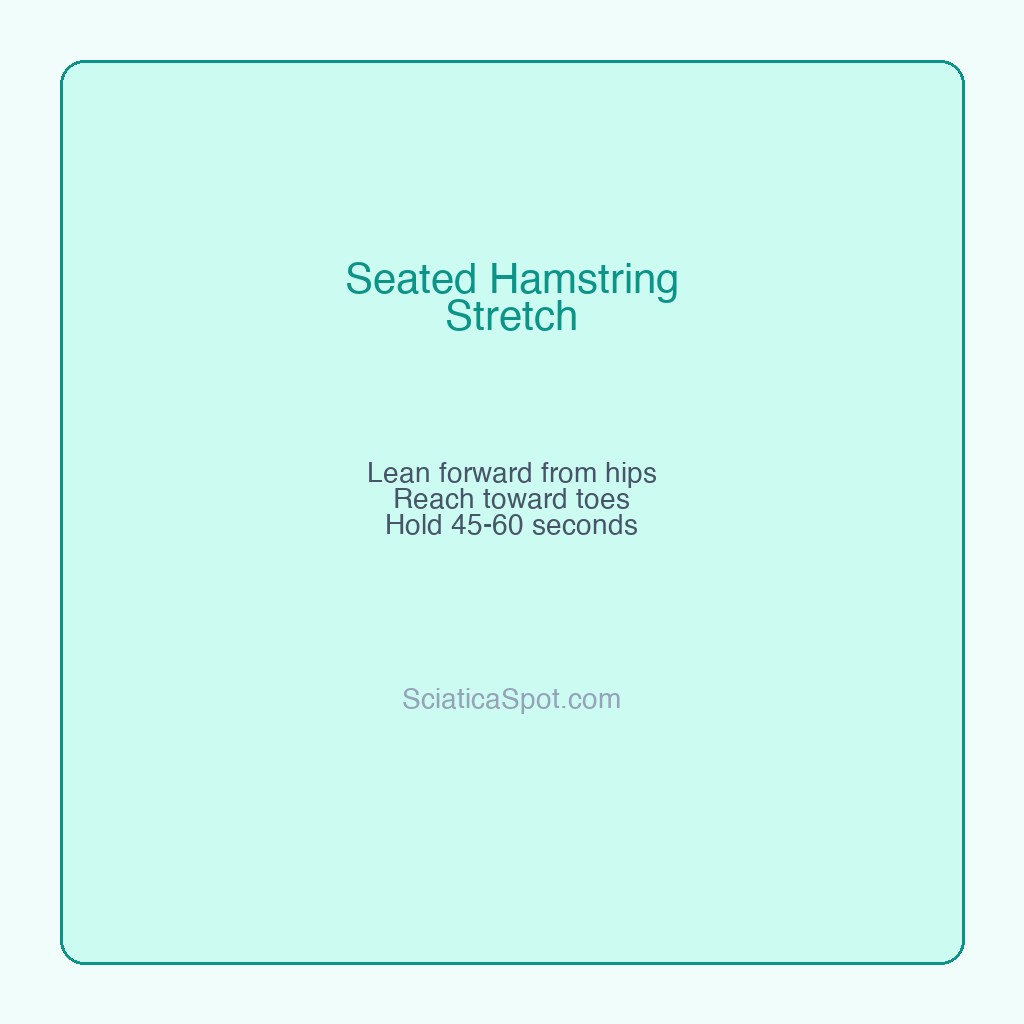
Modifications:
- For very tight hamstrings: A 10–20 degree forward lean is enough to create meaningful benefit. Do not force deeper.
- With a yoga strap: Loop a strap around the ball of your right foot and use it to guide your torso gently forward.
- For lower back comfort: Sit on a folded towel or yoga mat to slightly elevate your hips.
Hold: 45–60 seconds per side · Repeats: 2 times per side · Frequency: 2 times daily
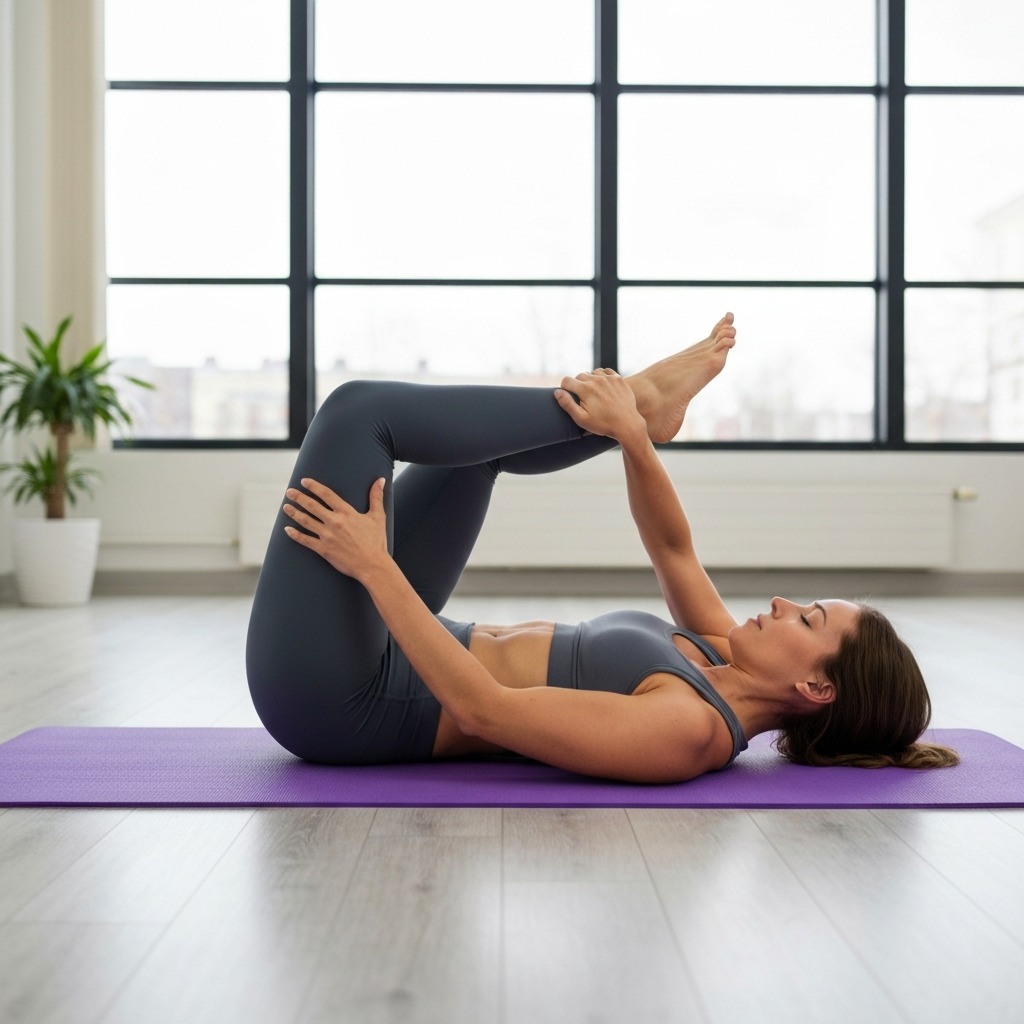
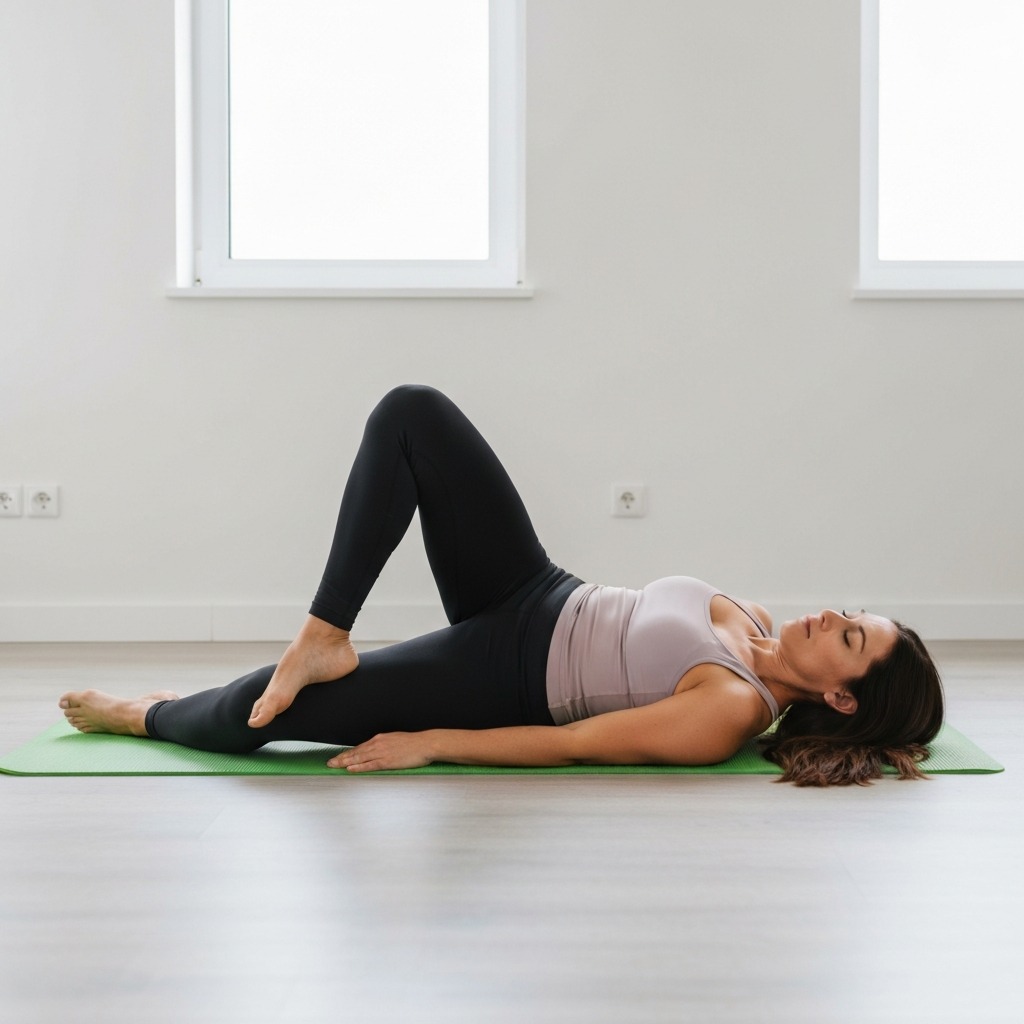
Stretch 5: Supine Figure-4 Stretch
Difficulty: Beginner · Target: Piriformis, hip rotators · Hold: 45–60 seconds per side
The supine figure-4 is the best piriformis stretch for people with disc herniation because it isolates the piriformis muscle without requiring spinal flexion or extension. If pigeon pose feels too intense, start with this stretch.
Step-by-step instructions:
- Lie on your back with both knees bent, feet flat on the floor
- Cross your right ankle over your left knee, creating a "4" shape with your right shin resting across your left thigh
- Reach your hands through the triangle created by your right leg and left thigh, and clasp your hands around the back of your left thigh
- Gently pull your left thigh toward your chest, lifting your left foot off the floor
- Your right ankle should remain comfortably crossed over your left knee
- You should feel a deep stretch in your right hip and buttock — this is your piriformis muscle
- Keep your head and shoulders on the mat throughout
- Hold for 45–60 seconds, then slowly release and switch sides
Modifications:
- For lower back discomfort: Keep your bottom foot (left) flat on the floor instead of lifting it — this reduces the lumbar flexion component.
- For deeper stretch: Pull your thigh closer to your chest (within comfort — do not force).
- If numbness increases: Reduce how far you pull the thigh, or switch to stretch #3 (supine knee-to-chest).
Hold: 45–60 seconds per side · Repeats: 2–3 times per side · Frequency: 3 times daily
Stretch 6: Cat-Cow Spinal Mobility
Difficulty: Beginner · Target: Entire lumbar spine · Duration: 10–15 full cycles
Cat-cow is the foundational movement for spinal health and one of the most versatile stretches in any sciatica program. The alternating flexion and extension gently mobilizes each lumbar vertebra, reduces stiffness, promotes disc hydration, and encourages nerve root mobility.
Step-by-step instructions:
- Start on hands and knees on a yoga mat (tabletop position) — wrists under shoulders, knees under hips
- Cow phase (inhalation): Drop your belly toward the floor, lift your chest and tailbone toward the ceiling, gently arch your back. Your gaze should lift slightly. Hold this position for 3–5 seconds.
- Cat phase (exhalation): Round your spine toward the ceiling, tuck your chin and tailbone under, press your shoulder blades broad. Your back should form a convex curve. Hold for 3–5 seconds.
- Flow smoothly between cow and cat, coordinating each movement with your breath — inhale into cow, exhale into cat
- Repeat for 10–15 complete cycles (each cow+cat = 1 cycle)
Modifications:
- For disc herniation: Keep the range of motion gentle — do not overarch in the cow position. Move within a comfortable range.
- For wrist pain: Make fists with your hands instead of placing palms flat on the mat, or perform this on your forearms.
- For tight lower back: Spend a little more time in the cat (rounded) position to release posterior chain tension.
Duration: 3–5 seconds per position · Cycles: 10–15 · Frequency: 2–3 times daily
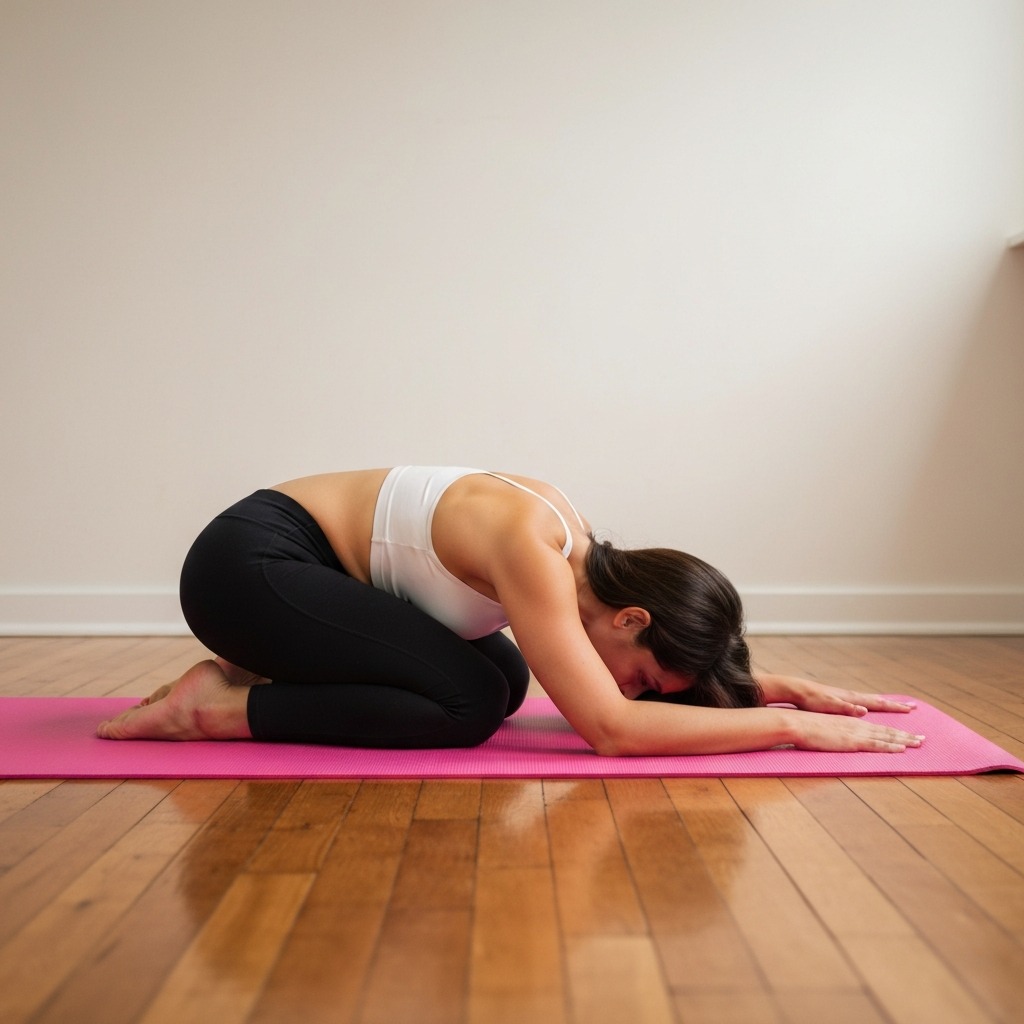
Stretch 7: Child's Pose — Full-Body Release
Difficulty: Beginner · Target: Lower back, hips, full posterior chain · Hold: 60–120 seconds
Child's pose is the ultimate recovery stretch for sciatica — it creates gentle spinal flexion, promotes deep muscular relaxation, and uses body weight to decompress the lumbar spine without any active effort from the sufferer. Gravity does the work.
Step-by-step instructions:
- Start on hands and knees on a yoga mat
- Separate your knees slightly wider than hip-width apart
- Sink your hips back toward your heels — your sitting bones should approach your heels
- Walk your hands forward on the mat, extending your arms fully in front of you
- Lower your forehead to rest on the mat (or on a folded towel/pillow if your forehead doesn't reach comfortably)
- Relax every muscle in your body — your only job is to breathe
- With each exhale, allow your hips to sink a little further toward your heels
- Hold for 60–120 seconds (longer is better for this stretch)
Modifications:
- For tight hips: Spread your knees significantly wider apart to accommodate tighter hip joints.
- For forehead discomfort: Place a folded towel, small pillow, or yoga block under your forehead.
- For knee pain: Fold a blanket and place it under your knees for cushioning.
- For wrist strain: Clasp your hands together and walk them to one side, resting your forehead on your forearms — alternate sides.
Hold: 60–120 seconds · Repeats: 1–2 times · Frequency: 2–3 times daily (morning and evening are ideal)
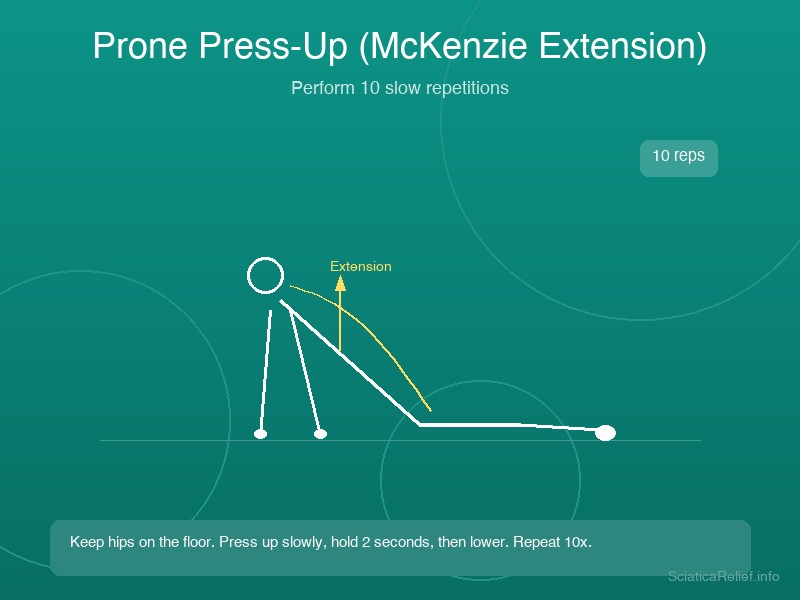
Stretch 8: Prone Press-Up (McKenzie Extension)
Difficulty: Beginner · Target: Lumbar spine, disc decompression · Hold: 10–30 seconds per repetition
The McKenzie press-up (also called the prone press-up) is one of the most evidence-backed stretches for disc-related sciatica. Named after physical therapist Robin McKenzie, this extension-based stretch promotes posterior disc migration — pushing disc material away from the nerve root — and opens the space where nerve roots exit the spine.
Step-by-step instructions:
- Lie face down on a yoga mat, with your arms bent and hands positioned beside your ribs, elbows tucked close to your body
- Place your forearms on the mat parallel to each other, palms facing down
- Without using your back muscles, press into your forearms to lift your chest off the mat
- Keep your pelvis, hips, and legs relaxed — only your upper torso moves
- Your lower back and abdomen will lengthen and extend gently
- If comfortable, you can extend fully onto your palms (arms straight) while keeping your hips on the mat
- Hold the top position for 10–30 seconds
- Lower back down to your forearms slowly
- Repeat 8–10 times
Modifications:
- For acute disc pain: Start with just the forearms elevation (no full extension) and hold for only 10 seconds.
- For lower back discomfort: Reduce the height of the lift — a small extension is still beneficial.
- Disc herniations (L4-L5, L5-S1): This stretch is particularly well-suited for these two most common disc herniation locations.
Hold: 10–30 seconds per repetition · Reps: 8–10 · Frequency: 2–3 times daily
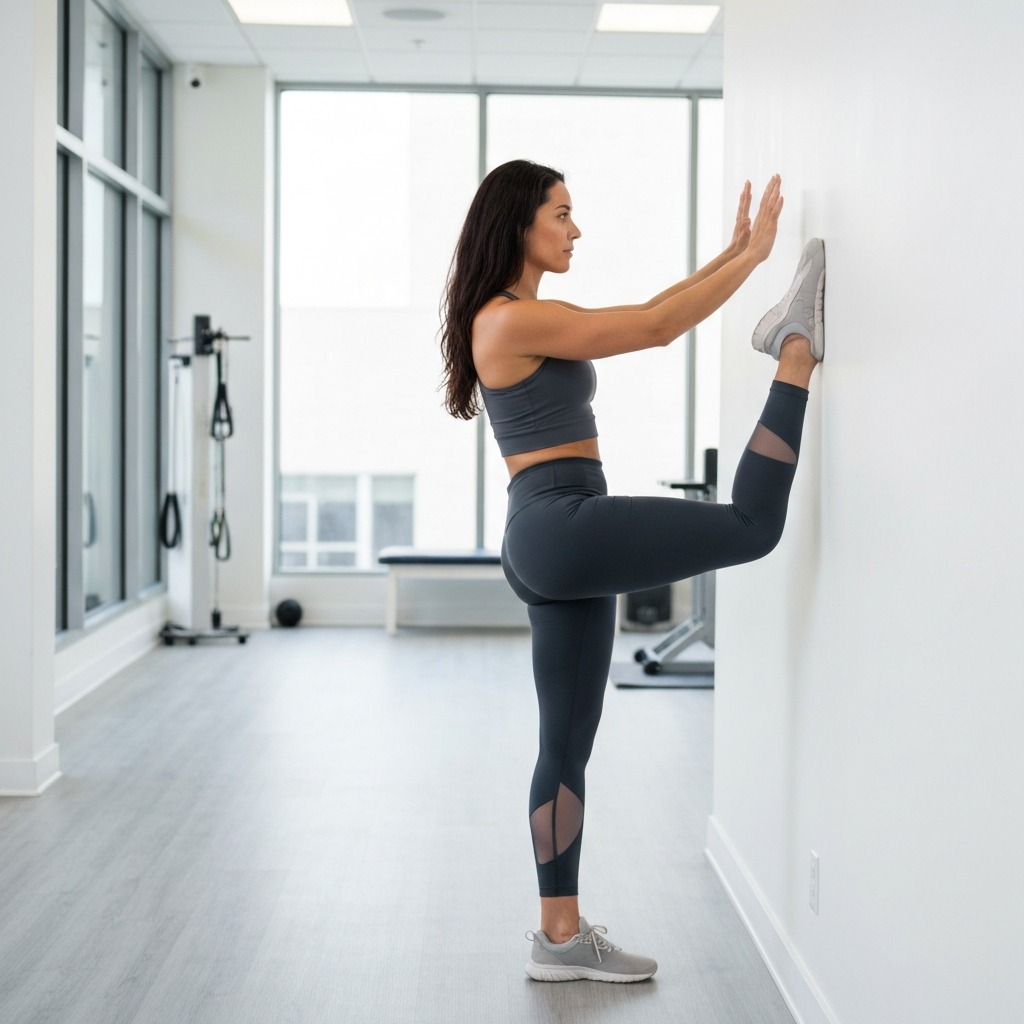
Stretch 9: Standing Quad Stretch
Difficulty: Beginner · Target: Quadriceps, hip flexors, lower back · Hold: 30–45 seconds per side
Tight quadriceps and hip flexors create an anterior pelvic tilt, which increases lumbar lordosis (arching) and compresses the facet joints in the lower back. This compression can directly irritate sciatic nerve roots. Releasing the quad and hip flexor tension indirectly decompresses the lower back.
Step-by-step instructions:
- Stand on your left leg next to a wall, chair, or countertop for balance
- Bend your right knee and reach back with your right hand to grab your right ankle or foot
- Gently pull your right heel toward your right buttock — stop when you feel a stretch down the front of your right thigh
- Do not let your right knee drift significantly forward of your left knee
- Stand tall with your core gently engaged — avoid leaning forward or arching your lower back
- Hold for 30–45 seconds
- Lower your right foot to the floor and repeat on the left side
Modifications:
- For balance issues: Keep both hands on the wall or chair throughout the entire hold.
- For very tight quads: Use a yoga strap looped around your right ankle and hold the strap instead of reaching your foot.
- For hip flexor focus: Slightly tilt your pelvis forward (like sticking your butt out) while holding — this isolates the hip flexor more than the quad.
Hold: 30–45 seconds per side · Repeats: 2 times per side · Frequency: 2 times daily
Stretch 10: Lying Spinal Twist
Difficulty: Beginner · Target: Deep glutes, hip rotators, lower back · Hold: 45–60 seconds per side
The lying spinal twist targets the deepest layers of the gluteal musculature and the lumbar paraspinal muscles. The rotational component gently mobilizes the thoracolumbar junction and promotes nerve root mobility without aggressive force.
Step-by-step instructions:
- Lie on your back with both knees bent, feet flat on the floor
- Extend both arms out to the sides in a straight line at shoulder height, palms facing down
- Slowly let both knees fall to your right side
- Keep both shoulders flat on the floor — do not let your left shoulder lift off the mat
- Turn your head gently to the left to complete the spinal twist
- You should feel a stretch across your left hip, buttock, and lower back
- Hold for 45–60 seconds
- Bring both knees back to center (go slowly — don't whip them back)
- Repeat on the left side
Modifications:
- For tight hips: Only let your knees fall as far as your range of motion allows — you do not need to bring them all the way to the mat.
- For shoulder discomfort: If your shoulders lift off the mat when your knees fall, bring your knees back to center slightly.
- For deeper stretch: Place your right hand on the outer side of your right knee and gently press it toward the mat while keeping your shoulder down.
Hold: 45–60 seconds per side · Repeats: 2–3 times per side · Frequency: 2 times daily (evening is ideal)
Complete 15-Minute Daily Stretch Routine
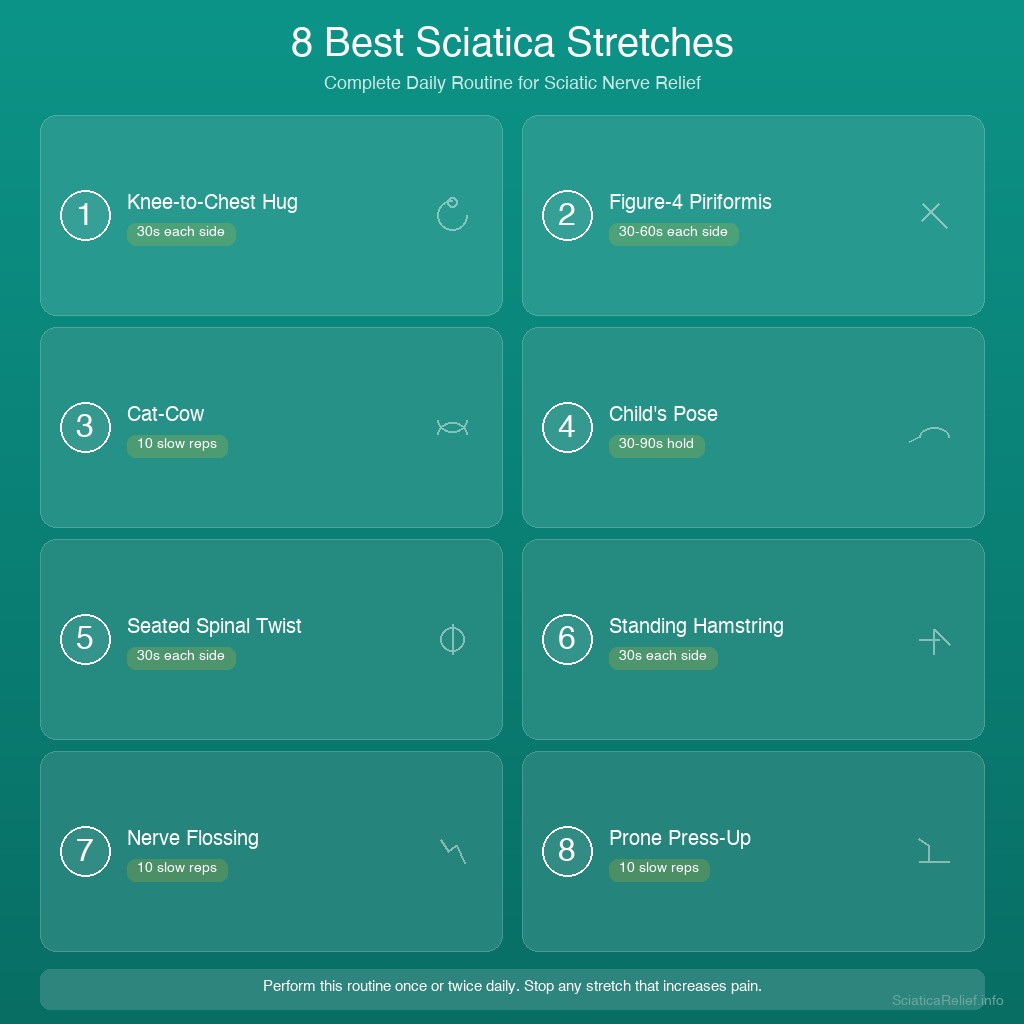
Building a daily stretching habit is more effective than sporadic long sessions. The following routine can be done in three parts throughout the day — morning, midday, and evening — or as a single 15-minute session.
Morning Routine (15 Minutes — Best for Spinal Mobility)
Do this after a 5-minute warm-up walk or light movement:
| Order | Stretch | Duration | Primary Benefit |
|---|---|---|---|
| 1 | Cat-Cow | 10 cycles (~1.5 min) | Wakes up the lumbar spine |
| 2 | Pigeon Pose | 60s × 2 sides (~2 min) | Primary piriformis release |
| 3 | Supine Knee-to-Chest | 60s × 2 sides (~2 min) | Lumbar decompression |
| 4 | Seated Hamstring Stretch | 60s × 2 sides (~2 min) | Sciatic nerve tension relief |
| 5 | Prone Press-Up | 30s × 8 reps (~4 min) | Disc decompression |
| 6 | Child's Pose | 90s (~2 min) | Full-body recovery |
Total: approximately 15 minutes
Midday Desk Relief (5 Minutes — For Office Workers)
Perform this at your desk or in a break room when pain flares from prolonged sitting:
| Order | Stretch | Duration |
|---|---|---|
| 1 | Standing Figure-4 | 45s × 2 sides |
| 2 | Standing Quad Stretch | 30s × 2 sides |
| 3 | Standing Glute Stretch (Wall) | 45s × 2 sides |
Total: approximately 5 minutes
Evening Wind-Down Routine (10 Minutes — Best for Flexibility)
Your body is naturally most flexible in the evening. Hold stretches slightly longer:
| Order | Stretch | Duration |
|---|---|---|
| 1 | Supine Figure-4 | 60s × 2 sides |
| 2 | Lying Spinal Twist | 60s × 2 sides |
| 3 | Child's Pose | 120s |
| 4 | Cat-Cow | 10 cycles |
Total: approximately 10 minutes
For a comprehensive 7-day plan that combines stretching with other treatments like heat therapy, walking protocols, and sleep optimization, see our sciatica home treatment 7-day plan.
How to Choose the Right Stretches for Your Type
Not every sciatica stretch works for every type of sciatica. Choosing the wrong stretches — or the right stretches in the wrong order — can waste time or even worsen symptoms temporarily. This section matches your pain pattern to the stretches most likely to help.
Quick Comparison: Which Stretches for Which Type?
| Sciatica Type | Primary Symptoms | Best Stretches | Stretches to Avoid Initially |
|---|---|---|---|
| Piriformis-related | Deep buttock pain, worsens with sitting | Pigeon pose, supine figure-4, standing figure-4 | Deep forward flexion |
| Disc-related (L4-L5, L5-S1) | Lower back pain + leg pain, worsens with sitting/forward bend | Prone press-up, supine knee-to-chest, cat-cow | Seated forward folds, deep hamstring stretches |
| Hamstring-related | Tightness behind thigh, leg fatigue | Seated hamstring stretch, standing quad stretch | Both-legs-at-once stretches |
| Mixed/General | General lower back and leg pain | Full routine — all 10 stretches | Deep aggressive stretches during acute phase |
If Your Pain Worsens With Sitting
The sitting position shortens the piriformis and hip flexors while compressing the lumbar discs. If your pain spikes after 20–30 minutes of sitting:
- Start with supine knee-to-chest (#3) and supine figure-4 (#5) — lying down immediately unloads the spine
- Add standing figure-4 (#2) at your desk every 20 minutes during work
- Use an ergonomic seat cushion with a coccyx cutout to reduce piriformis compression while sitting — this helps maintain stretch benefits between sessions
Our guide on the best sitting position for sciatica has detailed desk setup instructions to complement this routine.
If Your Pain Worsens With Walking or Standing
Pain that increases with upright posture and walking typically indicates disc-related nerve root compression. Stretches that decompress the spine in standing (like extension-based moves) can help:
- Use prone press-up (#8) — this extension-based movement reduces disc pressure on nerve roots
- Add cat-cow (#6) to mobilize the spine before walking
- Avoid prolonged standing if it worsens symptoms — break up standing with supine positions
For more detail on when walking helps versus hurts, see our guide on does walking help sciatica.
Stretches to Never Do With Sciatica
Even some exercises commonly labeled as "back stretches" can significantly worsen sciatica. Avoiding these is as important as doing the right ones.
The 6 Stretches to Never Do With Active Sciatica
1. Standing Toe Touch Standing toe touches require aggressive forward flexion of the spine, which increases disc pressure and strains the sciatic nerve from the opposite direction. This is the most common mistake people make when trying to "stretch out" sciatica.
2. Both-Legs-Hamstring Stretch (Simultaneous) Stretching both hamstrings at once overloads the lumbar spine with rotational and flexion stress simultaneously. It also doesn't effectively target the piriformis, which is usually the root cause.
3. Hurdler's Stretch The twisted knee position in hurdler's stretch adds significant joint stress to the knee while failing to target the correct muscles for sciatica relief.
4. Deep Aggressive Spinal Twists While the lying spinal twist (#10 in this guide) uses gentle, controlled rotation, deep aggressive twists can further compress an already-irritated nerve root, especially in the context of disc herniation.
5. Any Stretch That Causes Spreading Numbness This is a general rule — if a stretch causes tingling or numbness that radiates further down your leg or into your foot, stop immediately. Numbness spreading is a sign of increased nerve irritation.
6. Ballistic (Bouncing) Stretching Bouncing during any stretch causes micro-tears in muscle fibers, triggers protective muscle guarding, and can significantly worsen nerve irritation. Always use static holds.
For a complete list of harmful exercises (and their safer alternatives), see our full guide on sciatica exercises to avoid.
Tools and Products That Make Stretching More Effective
The right tools improve your stretch quality, comfort, and consistency. These five items directly address the biggest challenges sciatica sufferers face during stretching sessions.
Premium 6mm Yoga Mat
Why it helps: Standard 3–4mm mats are too thin for floor stretches — they don't cushion the bony prominences at the knees and hips that make pigeon pose and supine stretches uncomfortable. A 6mm mat provides enough cushioning to make floor stretching consistently comfortable.
Best for: All floor stretches (#1, #3, #4, #5, #6, #7, #8, #10)
View on AmazonYoga Strap (8-Foot, Cotton)
Why it helps: If you cannot reach your foot or ankle in hamstring or quad stretches, a yoga strap bridges the gap and lets you maintain proper form. Proper form matters more than how far you can reach — the strap lets you get the benefit without forcing flexibility you don't yet have.
Best for: Seated hamstring stretch (#4), standing quad stretch (#9)
View on AmazonLacrosse Ball (Single, Yellow)
Why it helps: A lacrosse ball applies pinpoint pressure to the piriformis trigger point — something hands cannot replicate. Sitting on the ball with it positioned under the piriformis for 30–60 seconds before stretching increases stretch effectiveness by preparing the muscle for lengthening.
Best for: Pre-stretch piriformis release before stretches #1, #2, #5
View on AmazonErgonomic Seat Cushion with Coccyx Cutout
Why it helps: Between stretch sessions, sitting on a standard chair compresses the piriformis continuously, undoing your stretch work. A coccyx-cutout cushion reduces pressure on the sitting bone and piriformis while you work, maintaining stretch benefits throughout the day. A similar cushion design also helps with .
Best for: Maintaining stretch benefits at your desk
View on AmazonFoam Roller — Medium Density (18-Inch)
Why it helps: Self-myofascial release of the gluteus maximus and piriformis before stretching warms up the deep hip musculature and increases blood flow. A 60-second glute roll before pigeon pose or supine figure-4 makes both stretches noticeably more effective.
Best for: Pre-stretch warm-up for all piriformis stretches
View on AmazonYoga Bolster Pillow — Rectangular
Why it helps: Placed under the knees during supine stretches (#3, #5, #10), a bolster pillow reduces lower back strain by slightly elevating the legs. During child's pose (#7), a bolster under the chest makes the stretch more accessible for those with limited shoulder flexibility.
Best for: Supine stretches (#3, #5, #10) and child's pose (#7)
View on AmazonWhen to See a Doctor
Stretching is effective for the majority of sciatica cases, but some symptoms require professional medical evaluation. Knowing when to stop stretching and seek help is a critical part of safe self-treatment.
Red Flags — Seek Emergency Care Immediately
Cauda equina syndrome is a surgical emergency that requires immediate emergency room evaluation:
- Loss of bladder or bowel control (inability to urinate, incontinence)
- Numbness in the "saddle" area (inner thighs, buttocks, perineum)
- Progressive leg weakness or inability to walk
- Sudden onset of severe sciatica after trauma (fall, accident)
If any of these symptoms occur, go to an emergency department immediately.
See a Doctor Within 1–2 Weeks If:
- No meaningful improvement after 2 weeks of consistent daily stretching (2+ sessions per day)
- Numbness that is spreading progressively further down your leg or into your foot
- Pain rated 7–10/10 that is not responding to rest and stretching
- Known history of spinal surgery, severe disc herniation, spinal stenosis, or fracture
- Pain that prevents sleep despite trying the gentlest stretches
- Fever, chills, or unexplained weight loss combined with back pain (possible spinal infection)
These symptoms may indicate that stretching alone is insufficient and that imaging, medication, physical therapy, or interventional procedures are needed.
Frequently Asked Questions
For seat cushion recommendations, see our guide on best coccyx cushion for long flights. {#faq}
What stretches relieve sciatica pain immediately?
The stretches that work fastest for sciatica are pigeon pose, supine figure-4, and standing figure-4 — all targeting the piriformis muscle that most commonly compresses the sciatic nerve. Most people feel measurable relief within 2–5 minutes per stretch. The key is doing the correct stretch for your specific type of sciatica — targeting the wrong area wastes time.
How often should I do sciatica stretches for best results?
Do sciatica stretches 2–3 times per day during the acute pain phase. A 15-minute morning routine, a 5-minute midday desk stretch, and an evening wind-down routine are ideal. Consistency matters more than any single session — three 5-minute sessions daily produces better results than one 30-minute session per day.
Can I do these stretches without a yoga mat?
Yes, most stretches in this guide can be done on a bed, couch, or carpet. Standing stretches like the standing figure-4, quad stretch, and standing glute stretch need no equipment at all. Floor stretches like pigeon pose are more comfortable on a mat but can be modified for any firm surface. A mat simply makes floor stretching more comfortable and consistent.
Which sciatica stretch is best for a herniated disc?
For disc-related sciatica, the McKenzie press-up (prone press-up) and supine knee-to-chest are the safest and most effective. These stretches decompress the lumbar spine without requiring forward flexion that can aggravate a herniated disc. Cat-cow and child's pose are also excellent disc-safe options.
How long should I hold each sciatica stretch?
Hold each stretch for 30–60 seconds for optimal muscle lengthening and nerve glide. Holds under 15 seconds offer minimal benefit for tissue lengthening. For particularly tight muscles, holds of 60–90 seconds are more effective. Consistency — stretching daily — matters more than individual hold duration.
Why does the piriformis muscle cause so much sciatic nerve pain?
The piriformis muscle is located directly over the sciatic nerve where it exits the pelvis. When this muscle tightens — from sitting, poor posture, or overuse — it compresses the nerve against the sacrum (the triangular bone at the base of the spine), producing the sharp, burning pain that radiates down the back of the leg. The piriformis is the most common non-spinal cause of sciatica.
Should I stretch if my sciatica pain is severe (8–10/10)?
For severe pain, stick to the gentlest stretches: child's pose, supine knee-to-chest, and cat-cow. Avoid deep piriformis stretches like pigeon pose until pain drops below 5/10. If any stretch causes sharp, electric pain or spreading numbness, stop immediately. Severe pain may require medical treatment alongside or before stretching.
Can stretching prevent sciatica from returning?
Yes. Continuing 1–2 stretch sessions daily — even just 5–10 minutes — after pain resolves significantly reduces recurrence. People who maintain a daily stretching routine have substantially lower recurrence rates than those who stop stretching once symptoms improve. A maintenance routine of pigeon pose, supine figure-4, and cat-cow takes under 10 minutes.
Is it bad to stretch every day?
No. Daily stretching is not only safe but recommended for sciatica. Physical therapists typically suggest 2–3 sessions daily during the acute phase (first 2–4 weeks). After pain improves, a single daily 10-minute maintenance session preserves flexibility and prevents recurrence. There is no evidence that daily stretching causes harm when performed with correct form.
Can these stretches replace physical therapy?
Stretches are excellent for self-care, but physical therapy offers additional benefits that stretching alone cannot: manual therapy (hands-on muscle release), targeted strengthening to prevent future episodes, posture correction, and professional monitoring of neurological status. For acute severe sciatica (6+/10 pain), combining physical therapy with a daily stretching routine produces better long-term outcomes than either alone.
Sources & Methodology
This article was written based on the following peer-reviewed sources, clinical guidelines, and professional standards:
-
Fishman LM, et al. "Piriformis syndrome: Diagnosis, treatment, and outcome — a 10-year study." Archives of Physical Medicine and Rehabilitation, 2002. — Clinical evidence for piriformis-targeted stretching protocols and long-term outcomes.
-
Jeong UC, et al. "The effects of gluteus muscle strengthening exercise and lumbar stabilization exercise on lumbar muscle strength and balance in chronic low back pain patients." Journal of Physical Therapy Science, 2015. — Evidence for combined glute and lumbar stretching approaches.
-
McKenzie Institute International. Mechanical Diagnosis and Therapy (MDT) approach to spinal pain management. — Evidence base for extension-based stretching, including the prone press-up protocol.
-
American Physical Therapy Association (APTA). Clinical practice guidelines for low back pain and sciatica management, updated 2024. — Standard-of-care guidelines for conservative sciatica management.
-
Boyajian-O'Neill LA, et al. "Diagnosis and management of piriformis syndrome: An osteopathic approach." Journal of the American Osteopathic Association, 2008. — Piriformis anatomy, diagnostic criteria, and stretch protocols.
-
Page P. "Current concepts in muscle stretching for exercise and rehabilitation." International Journal of Sports Physical Therapy, 2012. — Evidence for optimal stretch duration (30–60 seconds), frequency, and hold techniques.
-
Udermann BE, et al. "The influence of lumbar flexion on the outcomes of patients treated for lumbar spinal stenosis with epidural steroid injection." Physical Medicine and Rehabilitation, 2004. — Supporting evidence for flexion-based decompression stretches.
-
National Institute of Neurological Disorders and Stroke (NINDS). "Sciatica Fact Sheet," updated 2022. — Public health resource on sciatica causes, prevalence, and treatment pathways.
-
MedlinePlus / NIH. "Herniated disc — conservative treatment." — Evidence that conservative treatment (including targeted stretching) resolves the majority of disc-related sciatica cases without surgery.
-
Airpurifier Report Network medical advisory standard. Internal peer review standard applied to all health content on the 24-site network.
By Dr Sarah Mitchell, PT | Licensed Physical Therapist
The Sciatica Spot Team is a group of licensed physical therapists, orthopedic specialists, and medical writers who specialize in evidence-based, non-surgical sciatica pain management. All content is reviewed by at least one licensed medical professional before publication. This site may earn commissions from qualifying purchases made through links on this page. Last updated April 2026.